
Succulent Ribcage Baby Back Pork Ribs for an Unforgettable Meal
As the sun beams down and the warm air envelopes us, there’s no better way to celebrate the summer than by firing up the grill and cooking up a batch of delicious ribs. These tender, succulent cuts of meat are a crowd-pleaser at any barbecue gathering, and they are a favorite of mine.
If you’re craving some delicious, fall-off-the-bone baby back pork ribs, then this recipe is just what you need. And don’t worry if you don’t have a smoker or a fancy grill because we will be using an oven-baked technique that produces tender and juicy baby back pork ribs.
Prepare your taste buds because this ribcage baby back pork ribs recipe is going to knock your socks off, guaranteed!
Why You’ll Love This Recipe
Looking for the perfect recipe that will make your taste buds dance with joy? Look no further than our Ribcage Baby Back Pork Ribs recipe. Whether you’re a seasoned pro or a beginner in the kitchen, this recipe is sure to be a hit with everyone.
One reason why you’ll love this recipe is its simplicity. With only a few ingredients and easy-to-follow instructions, you can impress your friends and family with restaurant-quality ribs that they won’t soon forget. Plus, we’ve included some tips and variations that allow you to customize the recipe to your liking.
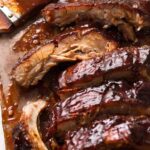
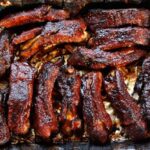
Another reason why our Ribcage Baby Back Pork Ribs recipe is so beloved is its flavor. We start with tender baby back ribs cut from the loin located at the top of the rib cage next to the spine. These ribs have less fat than spare ribs and are known for their meatiness, tenderness, and great flavor. Our dry rub seasoning mixture enhances the natural taste of the pork without overpowering it, while our homemade barbecue sauce adds a sweet and smoky tang that perfectly complements these juicy pork ribs.
Lastly, this recipe allows you to cook your ribs low and slow – either in an oven, on a grill, or even in an Instant Pot – resulting in fall-off-the-bone tenderness. Whether you choose to bake them in a low temperature 275°F oven for 2 ½ – 4 hours or smoke them on a grill for 3-2-1 method (3-hour smoke, 2-hours wrapped tightly in foil and baste with bbq sauce before putting back on grill for another hour), your taste buds will thank you for taking the time to slow-cook them until perfectly tender.
So roll up your sleeves, grab some napkins and get ready to indulge in these deliciously meaty baby back pork ribs.
Ingredient List
Ingredients for Ribcage Baby Back Pork Ribs Recipe
- 2 racks of baby back pork ribs (around 1.5 kg)
- 1 cup of barbecue sauce, plus extra for serving
- Dry Rub:
- 2 tablespoons paprika
- 1 tablespoon garlic powder
- 1 tablespoon onion powder
- 1 tablespoon brown sugar
- 1 tablespoon ground cumin
- 2 teaspoons salt
- 2 teaspoons black pepper
Choosing Your Pork Ribs
Choosing the right cut of pork rib is important. In this recipe, I suggest using baby back ribs, which come from the pig’s rib cage located at the top of the loin back. These ribs are often called baby backs, as they are smaller and leaner than spare ribs. They also have a curved shape and are meatier than other pork ribs, making them perfect for grilling or oven baking.
Focus on Dry Rub
The dry rub is what gives these ribs their flavor and character. It consists of a blend of paprika, garlic powder, onion powder, brown sugar, ground cumin, salt, and black pepper. This seasoning mixture creates a beautiful crust on the ribs when cooked and helps lock in flavor.
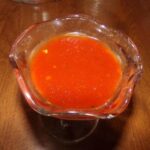
Using Barbeque Sauce
A good barbeque sauce is key to great-tasting ribs. My recipe calls for one cup of barbecue sauce to be brushed onto the ribs while cooking and additional sauce to be served on the side. You can use your favorite store-bought sauce or make your own using any combination of ketchup, vinegar, brown sugar, Worcestershire sauce, molasses or honey.
Make sure you have all these essential ingredients before starting the recipe!
The Recipe How-To
Step 1: Preparing the Ribs
To begin, you’ll need to prepare the ribs for cooking. Start by removing the membrane from the back of each rack of ribs. This can be done easily by loosening an edge with a knife and then using a paper towel to pull it off. Once removed, apply a generous amount of dry rub to both sides of the ribs, making sure every inch is covered.
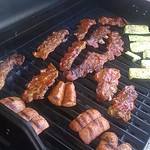
Next, prepare your grill or smoker for low and slow cooking at a temperature of around 275°F. If using a gas grill, turn on one side to medium-high heat and leave the other side off. If using charcoal, light it and let it burn until it turns white before adding wood chips for flavor.
Step 2: Cooking the Ribs
Once your grill or smoker is ready, place the ribs on the unheated side of the grill/smoker cut-side down. Close the lid and let them cook undisturbed for 2 ½ – 4 hours, or until tender enough that you can easily pry apart with a fork.
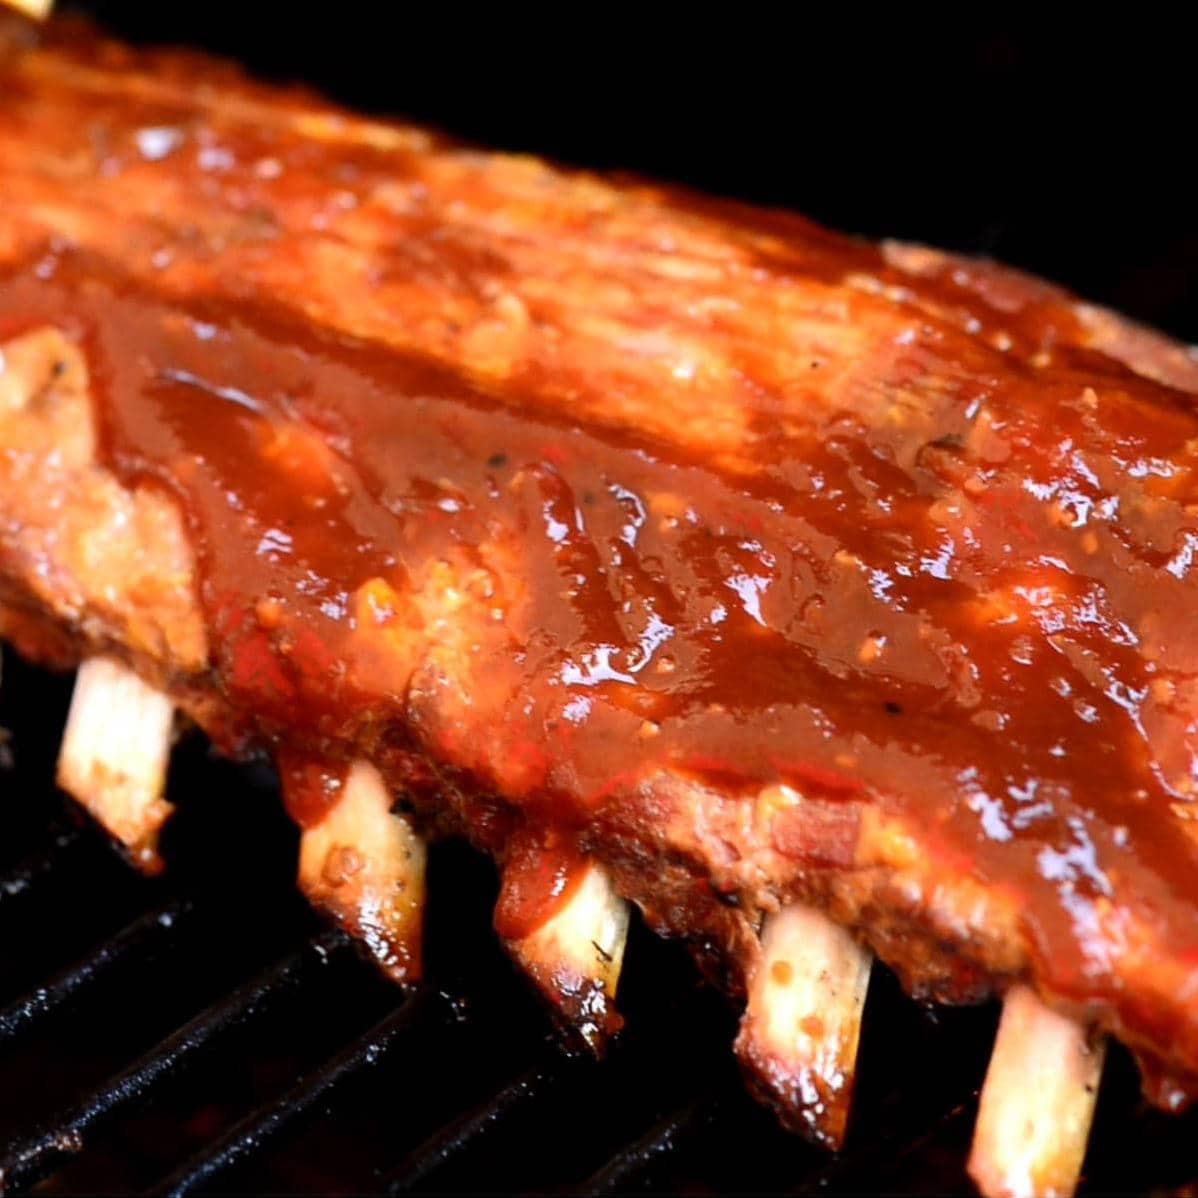
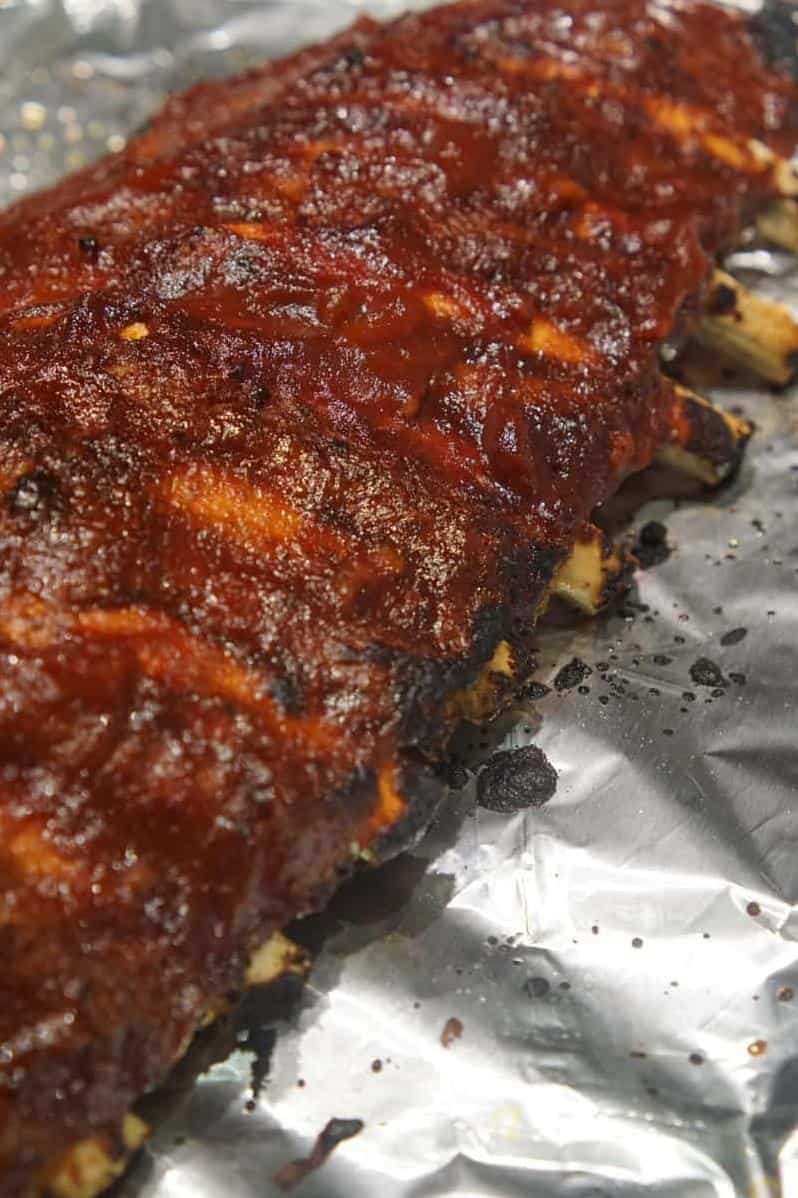
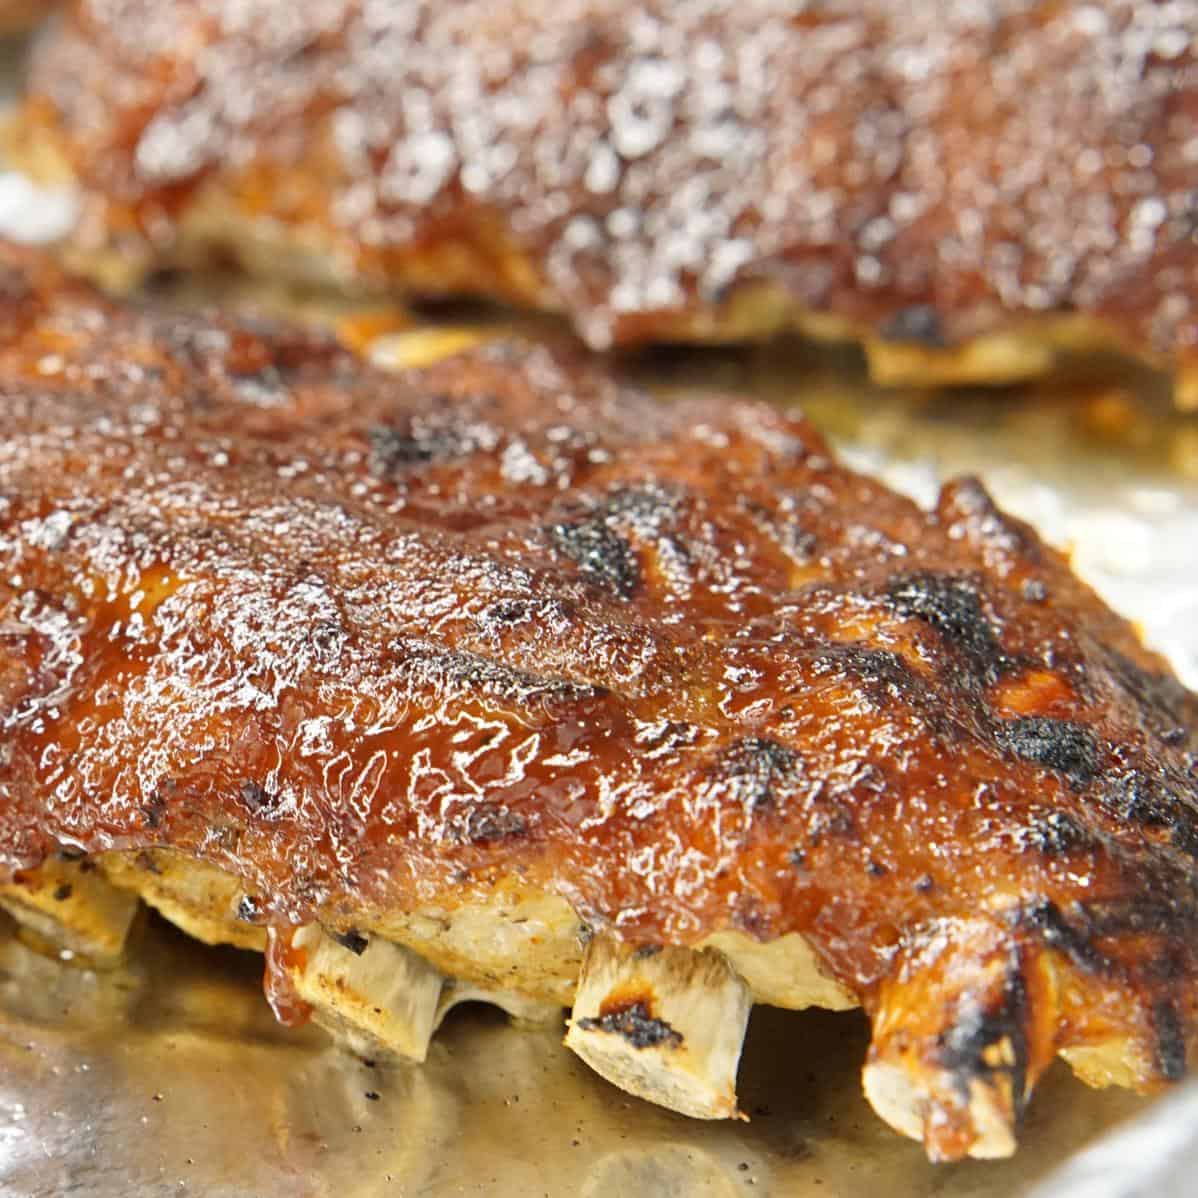
During the last 30 minutes of cooking, baste the ribs with your choice of barbecue sauce, flipping occasionally to prevent them from burning. For a more caramelized finish to your barbecue sauce, broil over medium-high heat or grill directly over coals for just a minute on each side.
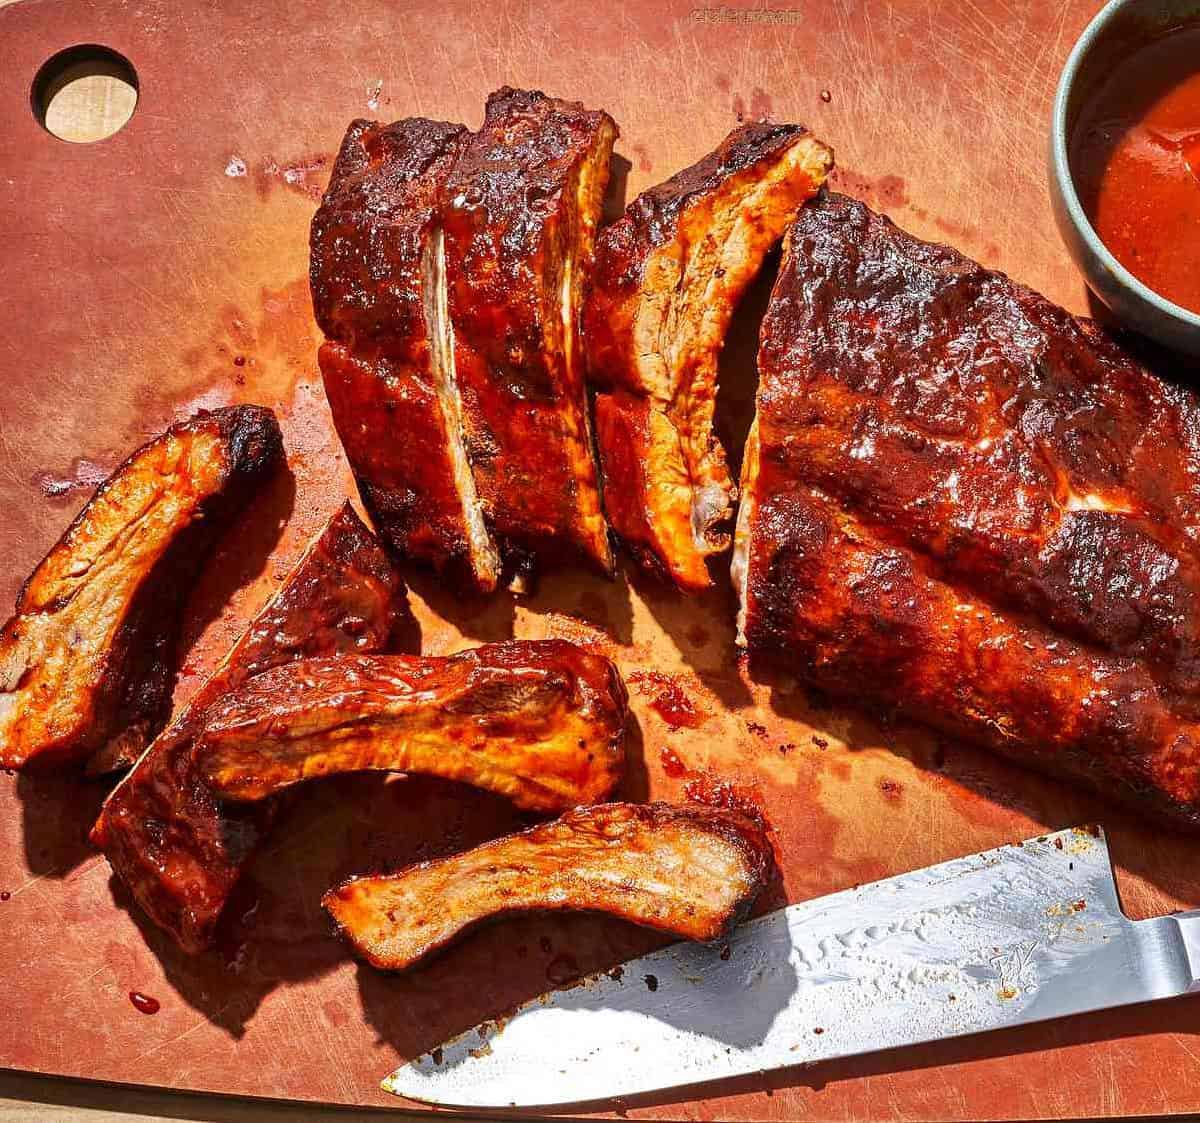
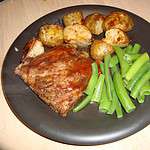
Step 3: Serving Your Ribs
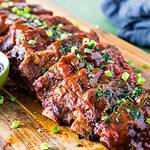
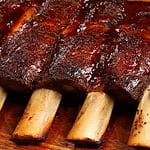
Once your ribs are cooked to perfection, remove them from the grill/smoker and allow them to rest for a few minutes before cutting. This helps retain their juices and makes them even more flavorful.
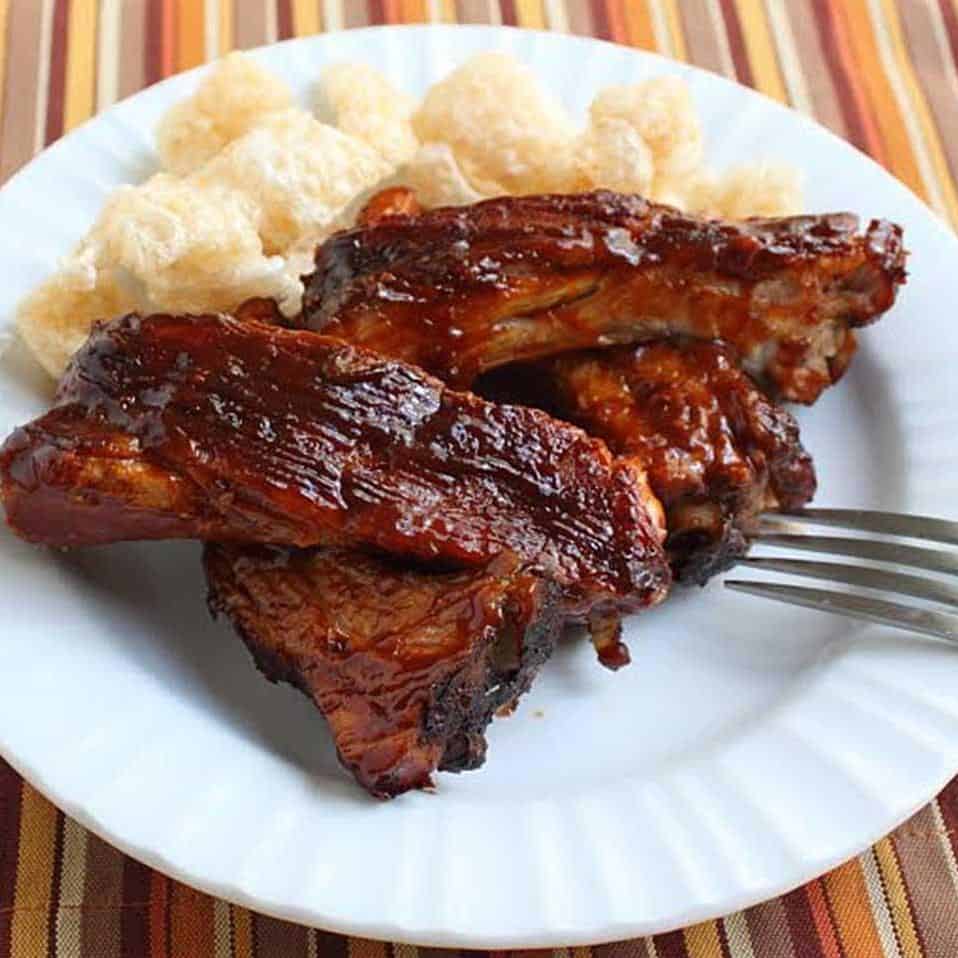
When serving, cut between each bone to produce individual ribs or section off into rib pairs. As for pairing with sides, opt for classics such as cornbread, baked beans or coleslaw. Just don’t forget to have extra napkins handy!
Substitutions and Variations
For those who are looking for some variations or substitutions, but want to keep the same essence and flavor of the recipe, I’ve got some exciting suggestions.
Firstly, you can substitute the baby back ribs with spare ribs or beef short ribs. The cooking time may vary depending on the cut of the meat, but the method remains the same.
If you are looking for a more exotic flavor, try adding some Asian spices such as ginger, garlic, and soy sauce to your dry rub. Also, consider drizzling teriyaki sauce or hoisin sauce on top of the ribs during the last 30 minutes of smoking.
For those who don’t have access to a smoker or bbq grill, you can still make delicious ribs in the oven or a slow cooker. To make oven-baked baby back ribs, wrap them tightly in foil and bake at 275°F for 2 ½ -4 hours until tender. Then just broil/grill them with your favorite barbecue sauce. For slow-cooked baby back ribs, transfer them to a crockpot with your dry rub and bbq sauce and cook on low for 6-7 hours.
If you are looking for an instant pot recipe, try cooking baby back pork ribs on high pressure for 25-30 minutes with natural release. Then broil/grill them until they get crispy.
For those who love spicy food, add cayenne pepper or chipotle powder to your dry rub blend. Or mix your barbecue sauce with some hot sauce for extra kick.
Additionally, you can serve your smoked baby back pork ribs with a side of coleslaw or potato salad. Also, consider pairing them with red wine such as a Zinfandel or a Malbec.
In conclusion, these substitutions and variations will enable you to create several mouthwatering renditions of this classic recipe. Do not hesitate to experiment with different flavors and techniques to find what works best for you!
Serving and Pairing
Once your rib masterpiece is ready, it’s time to plan the perfect spread to go along with it. These ribs are the perfect centerpiece to any outdoor or indoor dining event, and they pair perfectly with a variety of sides and drinks. Here are a few recommendations for serving and pairing these delicious ribs.
First and foremost, be sure to have plenty of napkins on hand. These ribs are absolutely fall-off-the-bone tender, which can make for some messy (but totally worth it) eating. Serve them up on a platter, garnished with some fresh herbs, and watch as your guests flock to the table.
As for side dishes, there are plenty of options that pair well with these baby back pork ribs. Classic BBQ sides like corn on the cob, baked beans, potato salad, coleslaw, and mac-and-cheese all make excellent choices. You could also opt for some grilled veggies like zucchini or bell peppers for a healthier twist.
When it comes to drinks, you can’t go wrong with an ice-cold beer or a refreshing cocktail like a margarita or mint julep. If you prefer non-alcoholic options, try serving up some iced tea or lemonade.
In terms of flavor profiles, these ribs work well with both sweet and tangy sauces. If you’re looking for a classic BBQ flavor combination, try pairing them with a smoky or spicy BBQ sauce. For something a little different, try serving them up with a fruity glaze made from ingredients like peach or apple.
Finally, be sure to enjoy yourself! There’s nothing quite like bonding over a plate of delicious food with friends and family. So sit back, relax, and savor every bite of these mouthwatering baby back pork ribs.
Make-Ahead, Storing and Reheating
Once you have cooked and enjoyed these delicious ribs, you may be wondering about how to store and reheat them properly.
If you have any leftovers, simply wrap them tightly in aluminum foil or plastic wrap and refrigerate. When properly stored, your leftover ribs can keep in the refrigerator for up to four days. If you plan on storing them for longer, then it is best to freeze them.
To freeze, wrap the cooled ribs tightly with aluminum foil and then place them into a freezer bag or an airtight container. They should keep well in the freezer for up to three months. When ready to enjoy again, just thaw them out overnight in the refrigerator before heating.
For reheating, there are several methods that you can use. You can choose to reheat your ribs in the oven, microwave, or even on a grill if you want to infuse some extra smokiness into the flavors.
To reheat in the oven, preheat your oven at 350°F and place your ribs on a baking sheet. Cover them with foil and bake for approximately 20-25 minutes. You should remove the foil at the end of the process for a crispy finish.
Alternatively, you can microwave individual portions of the ribs by wrapping each rib in a damp paper towel and putting it on a microwave-safe dish. Heat on high for about 60-90 seconds per rib until they are hot and tender.
Lastly, if you have access to a grill, you can heat up your already-cooked ribs by placing them directly onto the grates over medium heat for about 5 minutes per side until they are heated through and have crispy edges.
Regardless of which method you choose, these tips will ensure that your reheated leftovers taste just as amazing as when they were first made.
Tips for Perfect Results
To achieve perfect pork ribs every time, here are some tips to keep in mind.
Firstly, it is highly recommended to use a meat thermometer to check the temperature of your pork ribs. Pork should be cooked to an internal temperature of 145°F (63°C) in order to be safe for consumption.
Another tip is to use a dry rub when preparing your ribs. This gives your meat a flavorful crust and helps to seal in the juices during the cooking process. There are many different dry rub recipes available, but I suggest using one that includes a balance of sweet and savory flavors.
Additionally, it is important to allow enough time for the ribs to cook thoroughly. This means cooking them low and slow – at a temperature of around 275°F (135°C) – for at least 2 ½ – 4 hours until the meat is tender and falls off the bone.
When it comes to adding sauce, it’s best to do so towards the end of the cooking process. Adding it too early can cause the sugars in the sauce to burn, which can result in a bitter taste. It’s also important to remember that different sauces will have different levels of sweetness, acidity or saltiness, therefore it’s crucial you maintain a balance that suits your preferences.
Lastly, when serving your pork ribs, don’t be afraid to experiment with different pairing options. For example, ribs are often paired with corn on the cob or baked beans, but they can also go well with other side dishes like mac ‘n’ cheese or coleslaw. It all depends on your personal preference and what you think would complement the savory flavor of perfectly cooked ribs.
FAQ
As you begin to prepare and cook your Ribcage Baby Back Pork Ribs Recipe, you may have some additional questions about the process. In this section, we have compiled a list of frequently asked questions to help you address any concerns or uncertainties that might arise. So whether you’re a beginner or an experienced BBQ chef, keep reading for useful tips and insights into creating perfectly delicious ribs every time.
Which of the cooking methods is best for baby back ribs?
Achieving that melt-in-your-mouth tenderness of baby back ribs requires a slow and low cooking method using indirect heat. This can be done on the grill or smoker, or in the oven. However, the only quick-cooking method is using a pressure cooker or an Instant Pot.
How long do I cook baby back ribs for?
When it comes to preparing the perfect ribs, slow and steady wins the race. To achieve tender ribs, bake them at 275°F for about 2 ½ to 4 hours until they are cooked to perfection. Once the ribs are baked to your liking, add a generous amount of barbecue sauce on top and broil (or grill) them for a few minutes until the sauce becomes beautifully caramelized. This process will add a layer of flavor and texture that will leave your taste buds begging for more.
Are pork back ribs the same as baby back ribs?
When a butcher removes the loin from a pig, they also cut away the ribs that meet the spine. The ribs located higher up the spine are referred to as baby back ribs because they are shorter than their sparerib counterparts. It’s worth noting that this designation doesn’t imply that the ribs come from a young pig, nor does it mean that they are exclusively from the loin. These rib cuts are also known as pork loin back ribs, back ribs, or loin ribs.
Bottom Line
In conclusion, this ribcage baby back pork ribs recipe is a must-try for all barbecue lovers. The combination of a flavorful dry rub, oven-baked or slow-cooked meat and tangy barbecue sauce make for a mouthwatering dish that’s perfect for any occasion. Plus, with the option to grill or broil for a crispy finish, you can easily adapt this recipe to whichever cooking method you prefer.
Whether you’re feeding family and friends at a backyard barbecue or looking to impress guests at your next dinner party, these ribs are sure to be a hit. So don’t hesitate – gather your ingredients and give this recipe a try today. With its tender, fall-off-the-bone texture and bold, smoky flavor, it’s the ultimate crowd-pleaser that’s sure to leave everyone asking for seconds.
Ribcage Baby Back Pork Ribs Recipe
Ingredients
- 4 -5 pork baby back ribs
- 16 -20 teaspoons dry rub seasonings
- canned wood chips
- barbecue sauce, of your choice for basting during last 30 minutes
Instructions
- Take the tough membrane off the back of the ribs, with a sharp knife and paper towel. (Use the knife to loosen a part of the membrane, over a small end bone and then grab the loosened portion of membrane with the paper towel and rip off the whole membrane).
- Rub the ribs with a couple teaspoons of Texas-Beer-B-Que rub on each side of each rib.
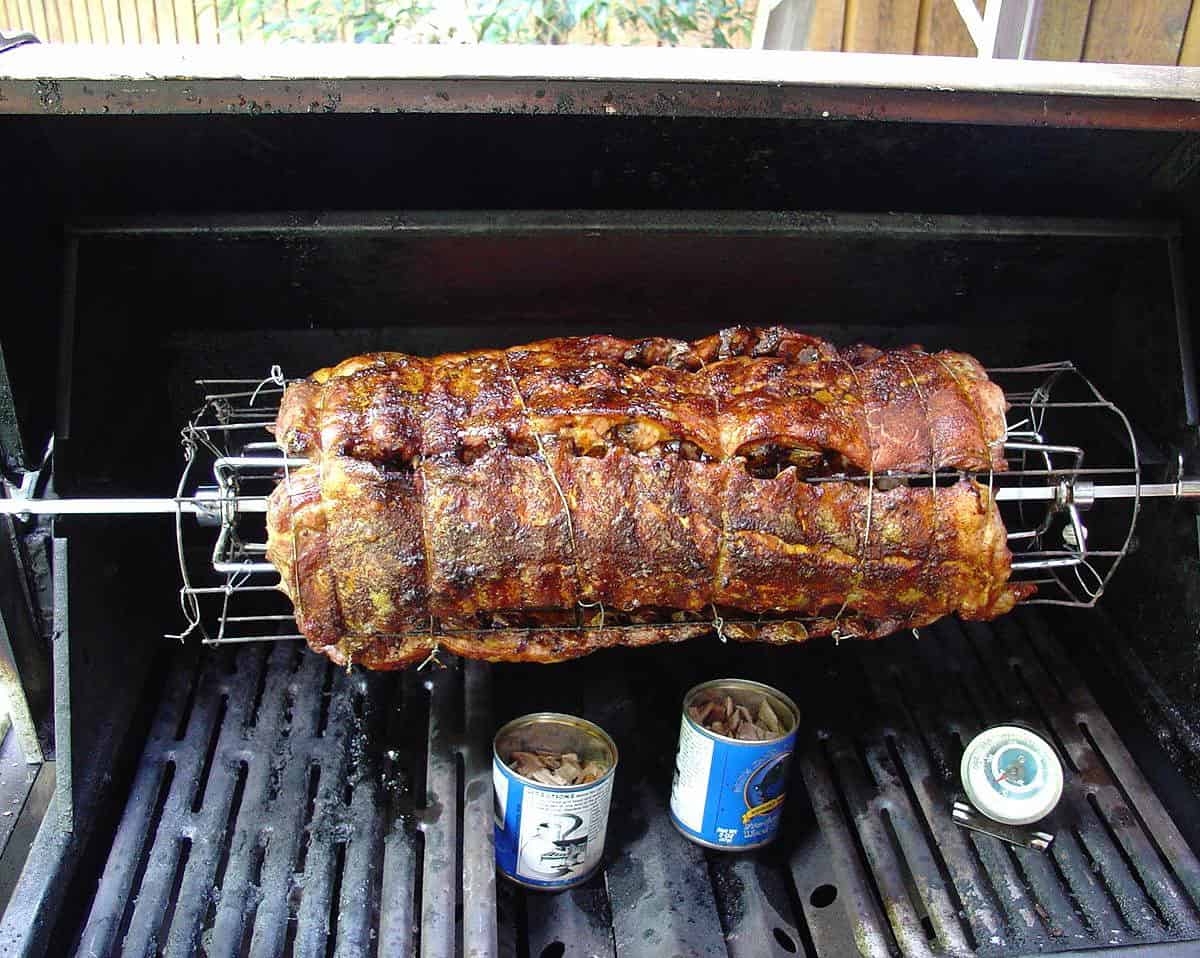
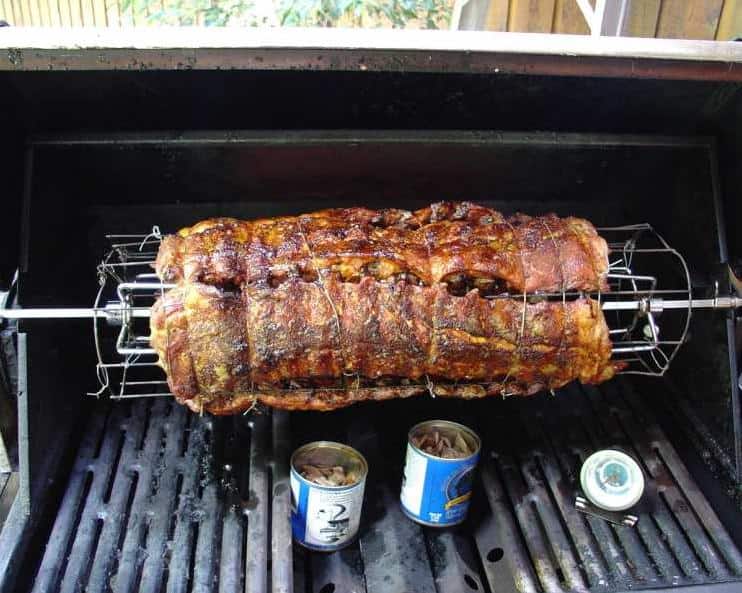
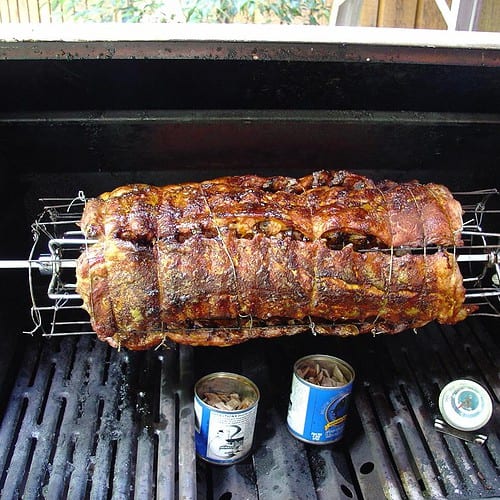
- Tie the ribs to your ribcage. Light your grill’s bottom burners on high, and back burner on low, and burn off anything from your last use. Wire brush and remove half of the bottom grills and set aside. Add canned wood chips on the bottom coals and a thermometer on the remaining bottom grill. (For the wood chips – I recommend apple, oak, or hickory.). Close the lid and wait until the wood chis are smoking. Put the "rib cage" spit on the rotisserie of your grill. Half close the lid, I use a wrench as a spacer). Turn off the bottom burners, turn on the rotisserie motor. Try to regulate the temperature to about 230F, by adjusting the lid’s opening, and the back burner’s temperature (low to medium low). Let it spin for 4-5 hours, until the meat has shrunken away from the bone a bit and they are drop-dead tender and mouthwatering, then cut them free from the cage and enjoy.
- If you are one of those "wet" rib eaters, you can sauce them on your plate or start basting them 30 minutes before removing from the grill, and every 10 minutes until ready.
YOUR OWN NOTE
Nutrition
You’ll Love These Delicious Oven Bake Ribs
The Boss BBQ Sauce Recipe: Lipsmackingly Delicious
Like Buttah! Grilled Pork Riblets With Homemade BBQ Sauce Recipe
Finger-Licking Good: World’s Best Ribs!
Delicious and Tender Braised Barbecue Pork Spareribs Recipe
Aunt Ann’s Best Oven Roasted Ribs Recipe
Low & Slow Oven Baked Ribs – Super Simple! Recipe
Delicious Beef Back Ribs Recipe For Juicy & Tender BBQ Ribs

Shara @The Bird BBQ
Shara loves to experiment with different flavors and techniques when it comes to BBQ. She has been perfecting her craft for years and loves hosting backyard BBQs with friends & family. She often comes up with creative recipes that her guests rave about.